Search Engine Optimization Yoast Plugin
There are a variety of search engine optimization plugins you can use for your WordPress blog. One of the most popular is Yoast. The Yoast plugin offers a lot of customizable options, including meta information and post titles. It also offers the capability to set destination pages for posts, which can help you direct traffic to a specific area on your site. This is a great option if you have an eCommerce store or landing page, as it can generate revenue from direct traffic to those pages.
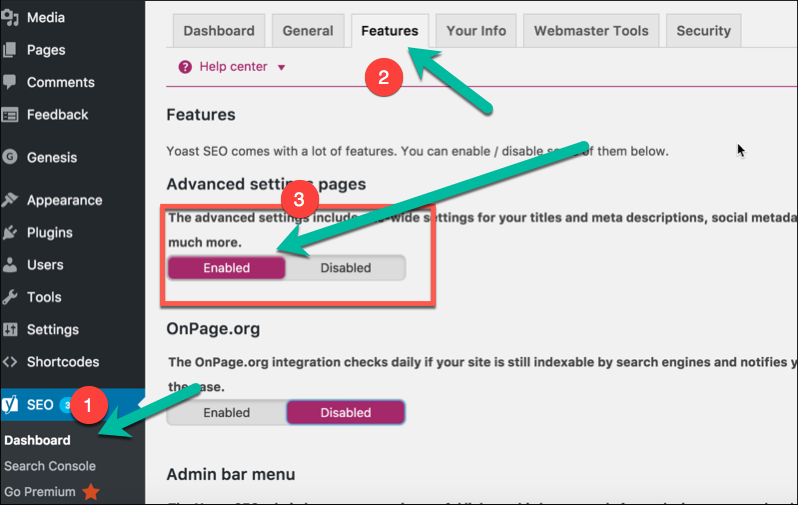
In this guide, we will show you how to use the Yoast plugin to set up meta information and optimize your posts for search engines. Before we get started make sure to install and activate the plugin first on your site. You can do that by going to Plugins > Add New on your WordPress dashboard and searching for ‘Yoast’.
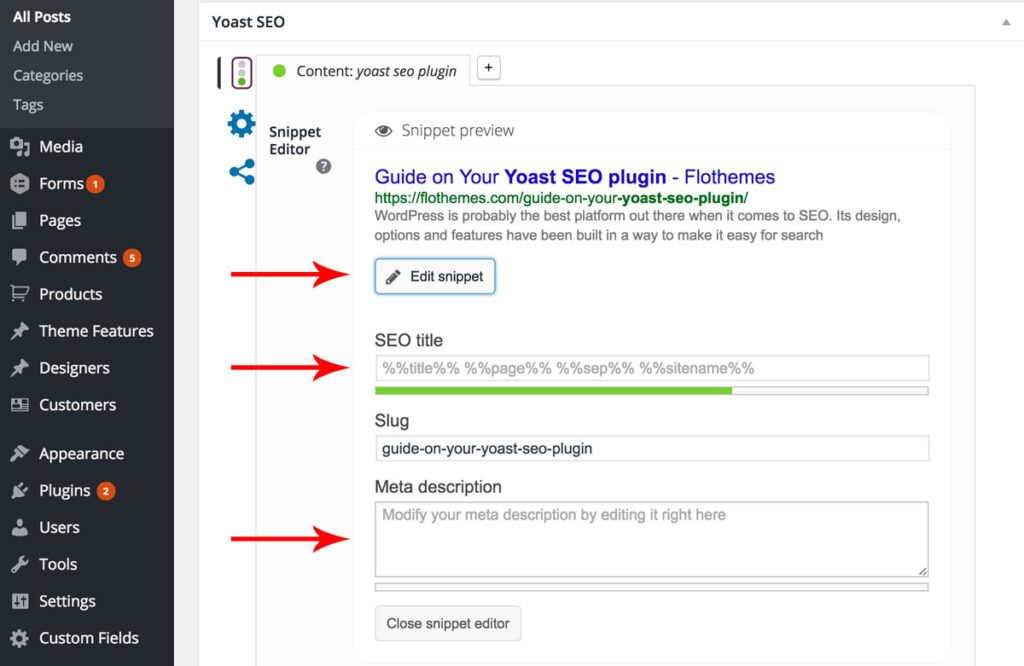
Step 1: The first thing you need to do is set up a title tag. This is similar to a title for a blog post and it should be unique and appealing to viewers. If someone were to search your site on Google they would see this title before clicking on your page, so you want it to be eye-catching and interesting.
The Yoast plugin offers 5 options for titles:
 Default (blank): Displays no title. This is best used as an SEO-friendly option that doesn’t stand out from the rest of the text on the page. It’s important that your visitors still know what they’re clicking on, even though there’s no specific ‘title’ on the page.
Click to read more: Displays a title tag that links back to the article. If someone is searching for a term related to your article, this can draw their attention to your content.
Post title: Displays the post title as the main search engine optimization tool. If you have a catchy or descriptive post title, then this will help you capture views from casual and organic search terms.
Excerpt (no link): This isn’t recommended because there’s no description of the page and it’s not much help for casual viewers. Clicking on an excerpt could send people off course, so we wouldn’t suggest using this setting again.
Excerpt (with link): This is a good option for blogs that want to use the excerpt section to add a little more detail and context to posts. If someone has read the excerpt and is interested in reading the rest of the post then they can click on it and be directed to your site.
Tip: We would recommend using the ‘Click to read more’ option because it draws viewers in, while also helping you capture views from casual searches. You can set this up by going to SEO > Titles & Metas on your WordPress dashboard and clicking on the drop-down menu under ‘Page titles’. Make sure you click ‘Save changes’ before moving on.
Step 2: Meta information can help you attract views from people who are searching for your brand or niche. The Yoast plugin offers 1 meta tag option, which is the ‘site’ tag. This helps Google understand what your site is about and it can also help to send viewers to your core content.
The Yoast plugin uses a 301 redirect to match incoming requests with the new value inserted in the ‘site’ meta tag. It’s important that you have a redirect installed on your site because this ensures that visitors will be sent where they need to go, even if they’re using an old link. The Yoast plugin uses the URL Rewrite module to do this, so you’ll need to have that installed.
Step 3: If one of the search engine optimization options didn’t work for you or you want to take another approach, there are a few other things you can try. The Yoast plugin offers 2 other options for meta information, so let’s go over them next.
The Yoast SEO_SEO tag contains information about how your page is performing in search engines. It’s best used for pages that aren’t usually accessed directly. You can set this up by visiting SEO > Titles & Metas on your WordPress dashboard and clicking on ‘Add description’. Now click ‘Save changes’ before moving on.
The Yoast SEO_DESCRIPTION tag does the same thing as above, but it’s meant to be used for pages that are directly accessed. You can set this up by visiting SEO > Titles & Metas on your WordPress dashboard and clicking on ‘Add meta description’. Now click ‘Save changes’ before moving on.
Tip: The Yoast SEO plugin also offers an option to edit your robots.txt file, which can prevent search engines from crawling parts of your site. This is best used for important pages like login pages and customer service areas because it prevents crawlers from finding vulnerabilities in those areas. If you have a login page then you can use that setting to prevent search engines from being able to crawl it.
However, if you want to keep search engines from seeing certain pages on your site, then there are a few other things you can try.
You can add a robot’s meta tag to hide specific pages from certain search engines. This is useful if you have important pages on the site that visitors might be accessing, but Google and other search engines can’t get access to it. You can do this by going to SEO > Titles & Metas on your WordPress dashboard and clicking on ‘Add Robots Meta Tag’. Now click ‘Save changes’ before moving on.
You can also go to SEO > Social on your WordPress dashboard and check the ‘noindex comments’ and ‘noindex pages’ options. This approach prevents search engines from seeing pages on your site that shouldn’t be indexed, such as comments and contact forms.
Tip: Take some time to learn about Yoast’s other SEO tools as well, such as the Flesch Reading Ease test and the Domain & Page Authority settings. You can learn more about those features on WordPress.org or by reading Yoast’s official guide on How to use all of Yoast SEO’s features.
Step 4: Once you have all of the Yoast SEO settings installed, it’s time to move on. Let’s take a look at your next step.
How to edit your .htaccess file
If you’re using an Apache web server, then there are a few settings that you can change in your site’s .htaccess file to improve your site’s search engine rankings. This step isn’t necessary for everyone, but there are some useful things that you can do with it. Here are 3 things that are worth trying out.
1. Add a 301 redirect to remove duplicate content
Search engines don’t like duplicate content because it can cause problems for their algorithms. If your site has duplicate content issues, then it can lower your rankings or ban you entirely.
The Yoast SEO plugin uses the HTTP Status Code 301 redirect to prevent this. This means that it’s best used for pages that are typically accessed directly instead of through search engines or social media, such as your blog or contact page. You can set this up by visiting SEO > Pages on your WordPress dashboard and then clicking on ‘Add 301 redirect’. Make sure you click ‘Save changes’ before moving on.
This will send every visitor to the correct version of the page so there can be no issues with duplicate content.
2. Enable the Index-Ignore Status Codes option
This feature is used for specific pages on your site that need to be crawled, but not indexed. Sites with this kind of issue usually have a 404 error, which means that a page they’re looking for doesn’t exist. Your WordPress site might not have a 404 error, but it’s possible that it does. You can keep a clean .htaccess file and disable this feature for any page on your site that you don’t want to send to search engines. You’ll want to do this if you have an error page that should never be accessed by search engines.
You can enable the Index-Ignore Status Codes option by visiting SEO > All Pages on your WordPress dashboard and clicking on ‘Add status code’. Now click ‘Save changes’ before moving on.
Now instead of sending a 404 error to search engines, your site should redirect visitors to another page without an error. This is good because it’ll stop the search engines from crawling the page and it’s also good for visitors who can’t find what they’re searching for.
3. Remove comment spam and other inappropriate content from your site
If you have a ton of spam comments, then it might be affecting your site’s rankings in certain ways. This is because search engines will penalize your site if you have a lot of spam, or any other kind of inappropriate content, on it.
You can fix this by removing the comments from the database. You can do that by going to Comments > Comments on your WordPress backend and clicking on ‘Delete all’. Make sure you click ‘Save Changes’ before moving on.
Tip: If you need to remove spam comments manually, then it’s helpful to use the Spam Comment Filter plugin. This plugin automatically detects spam comments based on certain criteria and allows you to approve or reject them easily. It’ll make the process of cleaning up your site easier for sure.
Step 5: Now that you have your site’s .htaccess file ready, you’re ready to move on. Let’s take a look at your last step.
How to use robots.txt to help optimize your site’s rankings
Robots.txt is a text file that allows you to instruct search engines and other crawlers about how and where to crawl and index certain content on your site. Search engines can be set up to ignore certain parts of the index, such as comments and contact forms, so their pages aren’t found by search engines. You can do this by writing instructions in robots.txt files for specific pages or entire directories on your site.
This is important because it puts the control in your hands over which parts of your site can be indexed on search engines. Let’s take a look at 5 things to know about robots.txt files.
1. Robots.txt is located in the root directory of your site, unless you specify otherwise. If you don’t specify a particular folder, then search engines will assume that all of the content of that folder should be indexed under their rules.
2. Robots.txt works best on websites with multiple pages, especially if they’re large or if there are pages on them with popular search terms in their titles or descriptions.
3. Robots.txt has no effect on pages that aren’t indexed by search engines. You can use it to exclude certain parts of your site from Google, Bing and other search engines, but only if they’re listed in the robots.txt file.
4. Search engines and crawlers won’t follow robots.txt files if you don’t specify where they should go or if you use an ‘all’ or ‘noindex’ value for them, which is the default value for this feature. This is why things like spiders and bots get confused when you use this method to exclude content from search engines on your site.
5. Generating robots.txt files can be tedious, especially if you’re experienced with WordPress, so there are a few tools that you can use to automate this process. They’ll make it easier for you to create and edit robots.txt files on your site manually and automatically without having to learn the ins and outs of this feature.
Here are some free options:
WP Robo Free: This tool helps you create and edit robots.txt files most conveniently using a drag-and-drop interface that’s easy to use and understand even if you’re not tech savvy! It allows you to exclude specific parts of your site from Google indexing, such as posts or pages you don’t want search engines to find.
WP Robot: Another option is WP Robot. This plugin allows you to create and edit robots.txt files most easily using an easy-to-understand interface with drag-and-drop options that are just as convenient to use as the WordPress Robo Free tool! It also allows you to exclude specific search engines from crawling certain parts of your site, similar to WP Robo Free.
Tip: Make sure you’re continuing to index important pages on your site by following our guide, How to Find Important Pages on Your Website for SEO. This will help ensure they can still be found even if they’re being crawled by search engines less frequently or not at all.
Step 6: Once you’ve generated your robots.txt file, add it to the root directory of your website. You can do this by accessing Settings > Reading on your WordPress dashboard and clicking on ‘Add new’ under the ‘Templates’ section.
Now enter a title and a description for the file and then click ‘Save Changes’. It needs to be in the root directory (that is, in the top level of your website) otherwise search engines will ignore it. An example of what a robots.txt file might look like:


